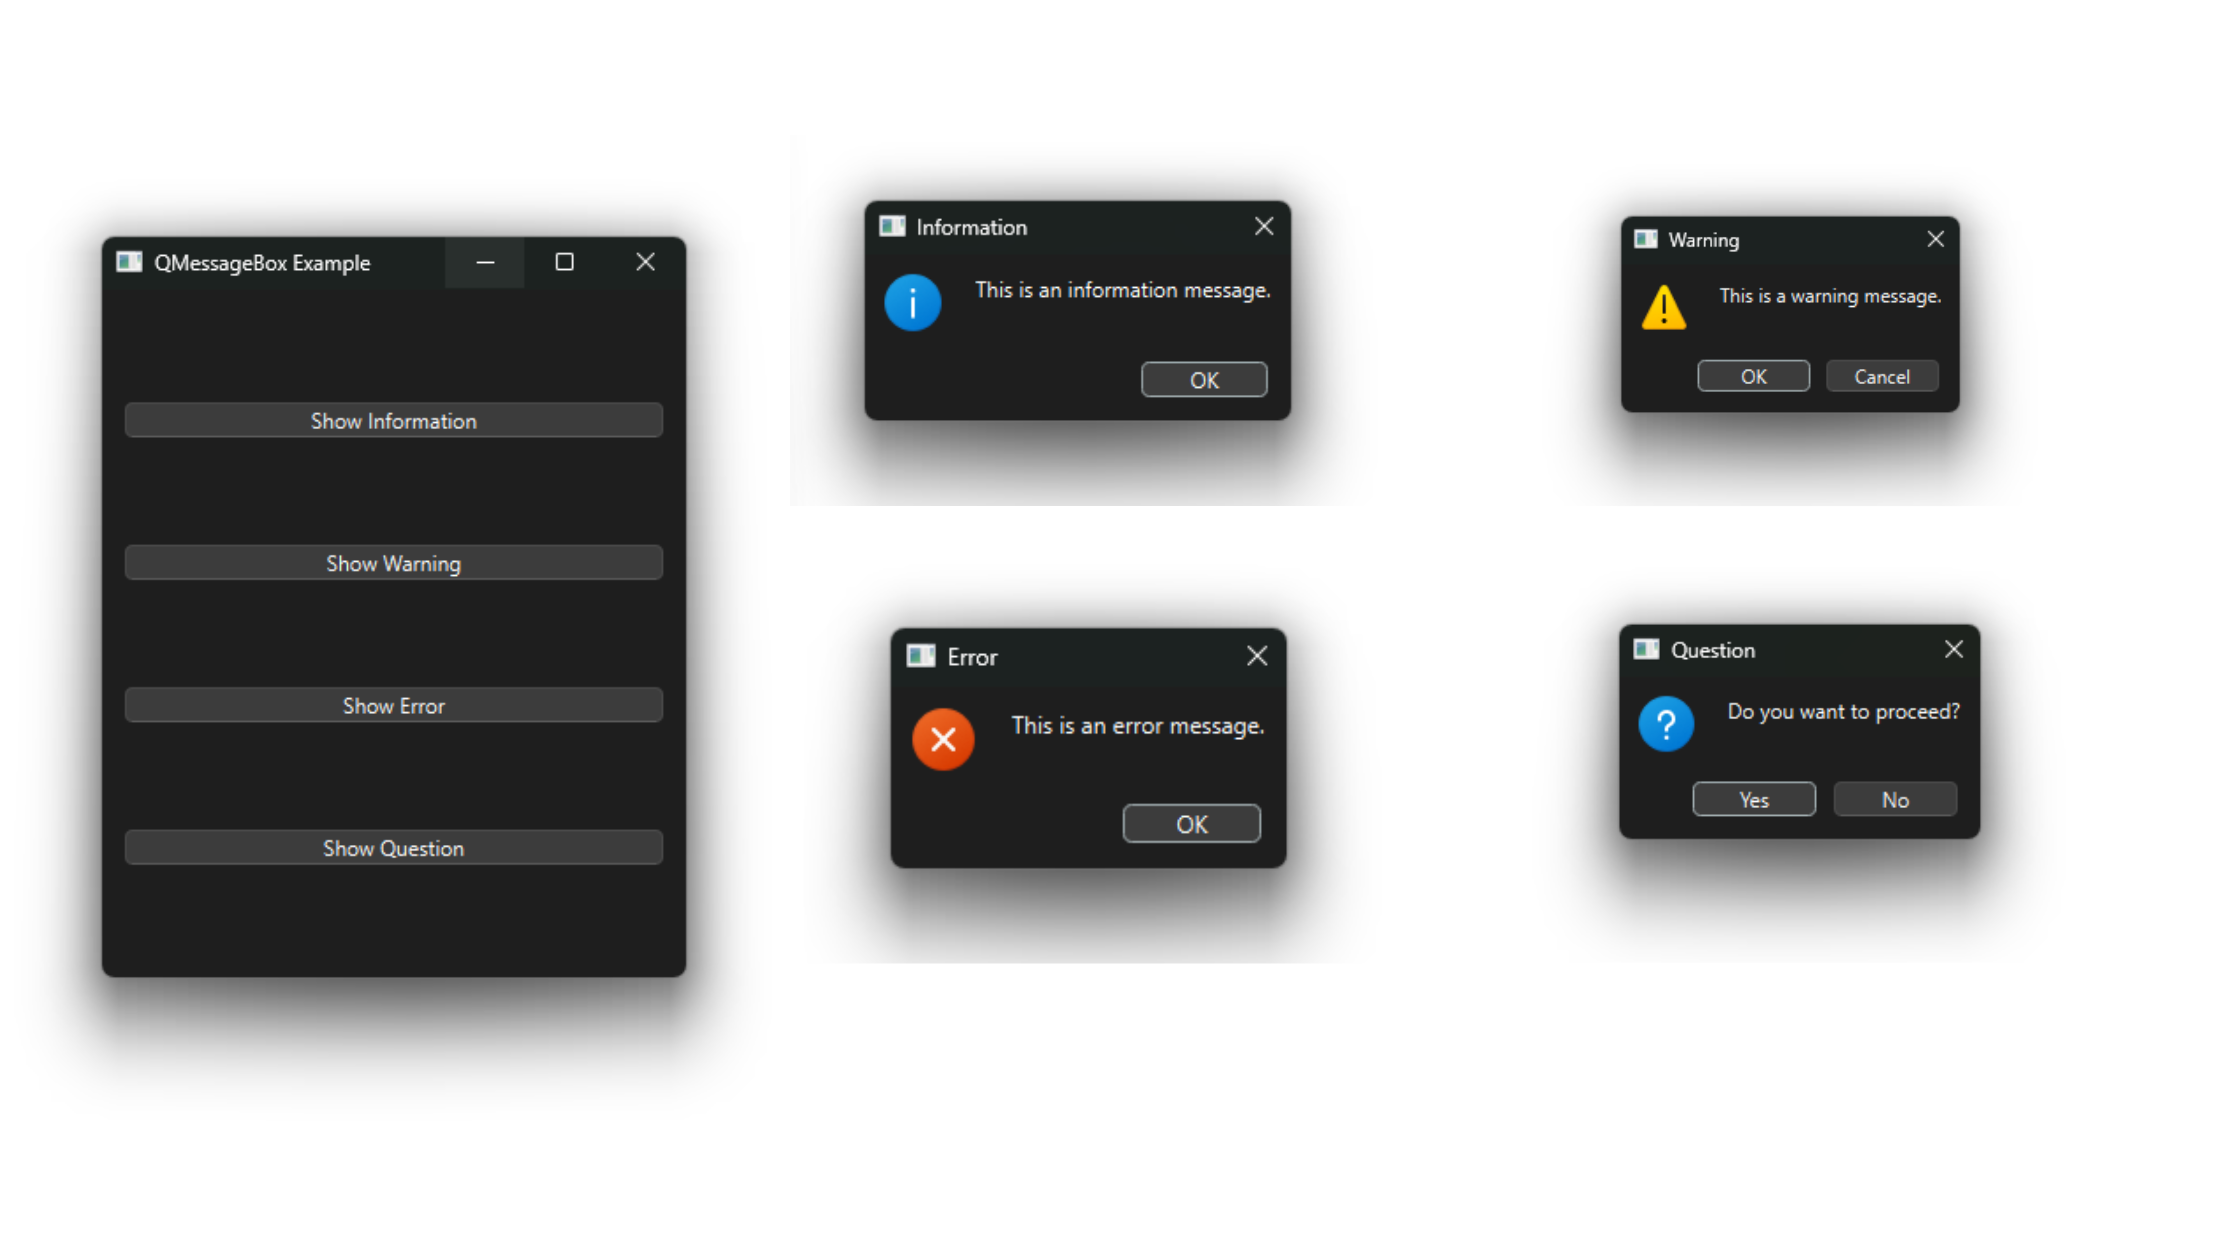
QMessageBox is a convenient and easy-to-use dialog box in PySide6 for displaying messages to the user. It can be used to show information, warnings, errors, or to ask the user a question. QMessageBox provides built-in buttons like OK, Cancel, Yes, and No, making it easy to create standard message dialogs.
Key Features of QMessageBox
- Standard Dialogs: Provides predefined dialogs for information, warnings, errors, and questions.
- Customizable Buttons: Allows adding standard buttons like OK, Cancel, Yes, and No.
- Icons: Displays standard icons to indicate the type of message (information, warning, error, question).
- Text and Detailed Text: Supports setting a main message and additional detailed text.
- Modal Dialog: Operates as a modal dialog, blocking interaction with other windows until dismissed.
Creating a QMessageBox
To create a QMessageBox, instantiate the QMessageBox class and configure its properties. Here is a basic example:
from PySide6.QtWidgets import QApplication, QMessageBox, QPushButton, QVBoxLayout, QWidget

class MessageBoxExample(QWidget):
    def __init__(self):
        super().__init__()

        layout = QVBoxLayout()

        self.info_button = QPushButton("Show Information")
        self.info_button.clicked.connect(self.show_info_message)

        layout.addWidget(self.info_button)
        self.setLayout(layout)
        self.setWindowTitle('QMessageBox Example')

    def show_info_message(self):
        msg_box = QMessageBox()
        msg_box.setIcon(QMessageBox.Information)
        msg_box.setText("This is an information message.")
        msg_box.setWindowTitle("Information")
        msg_box.setStandardButtons(QMessageBox.Ok)
        msg_box.exec()

app = QApplication([])
window = MessageBoxExample()
window.show()
app.exec()
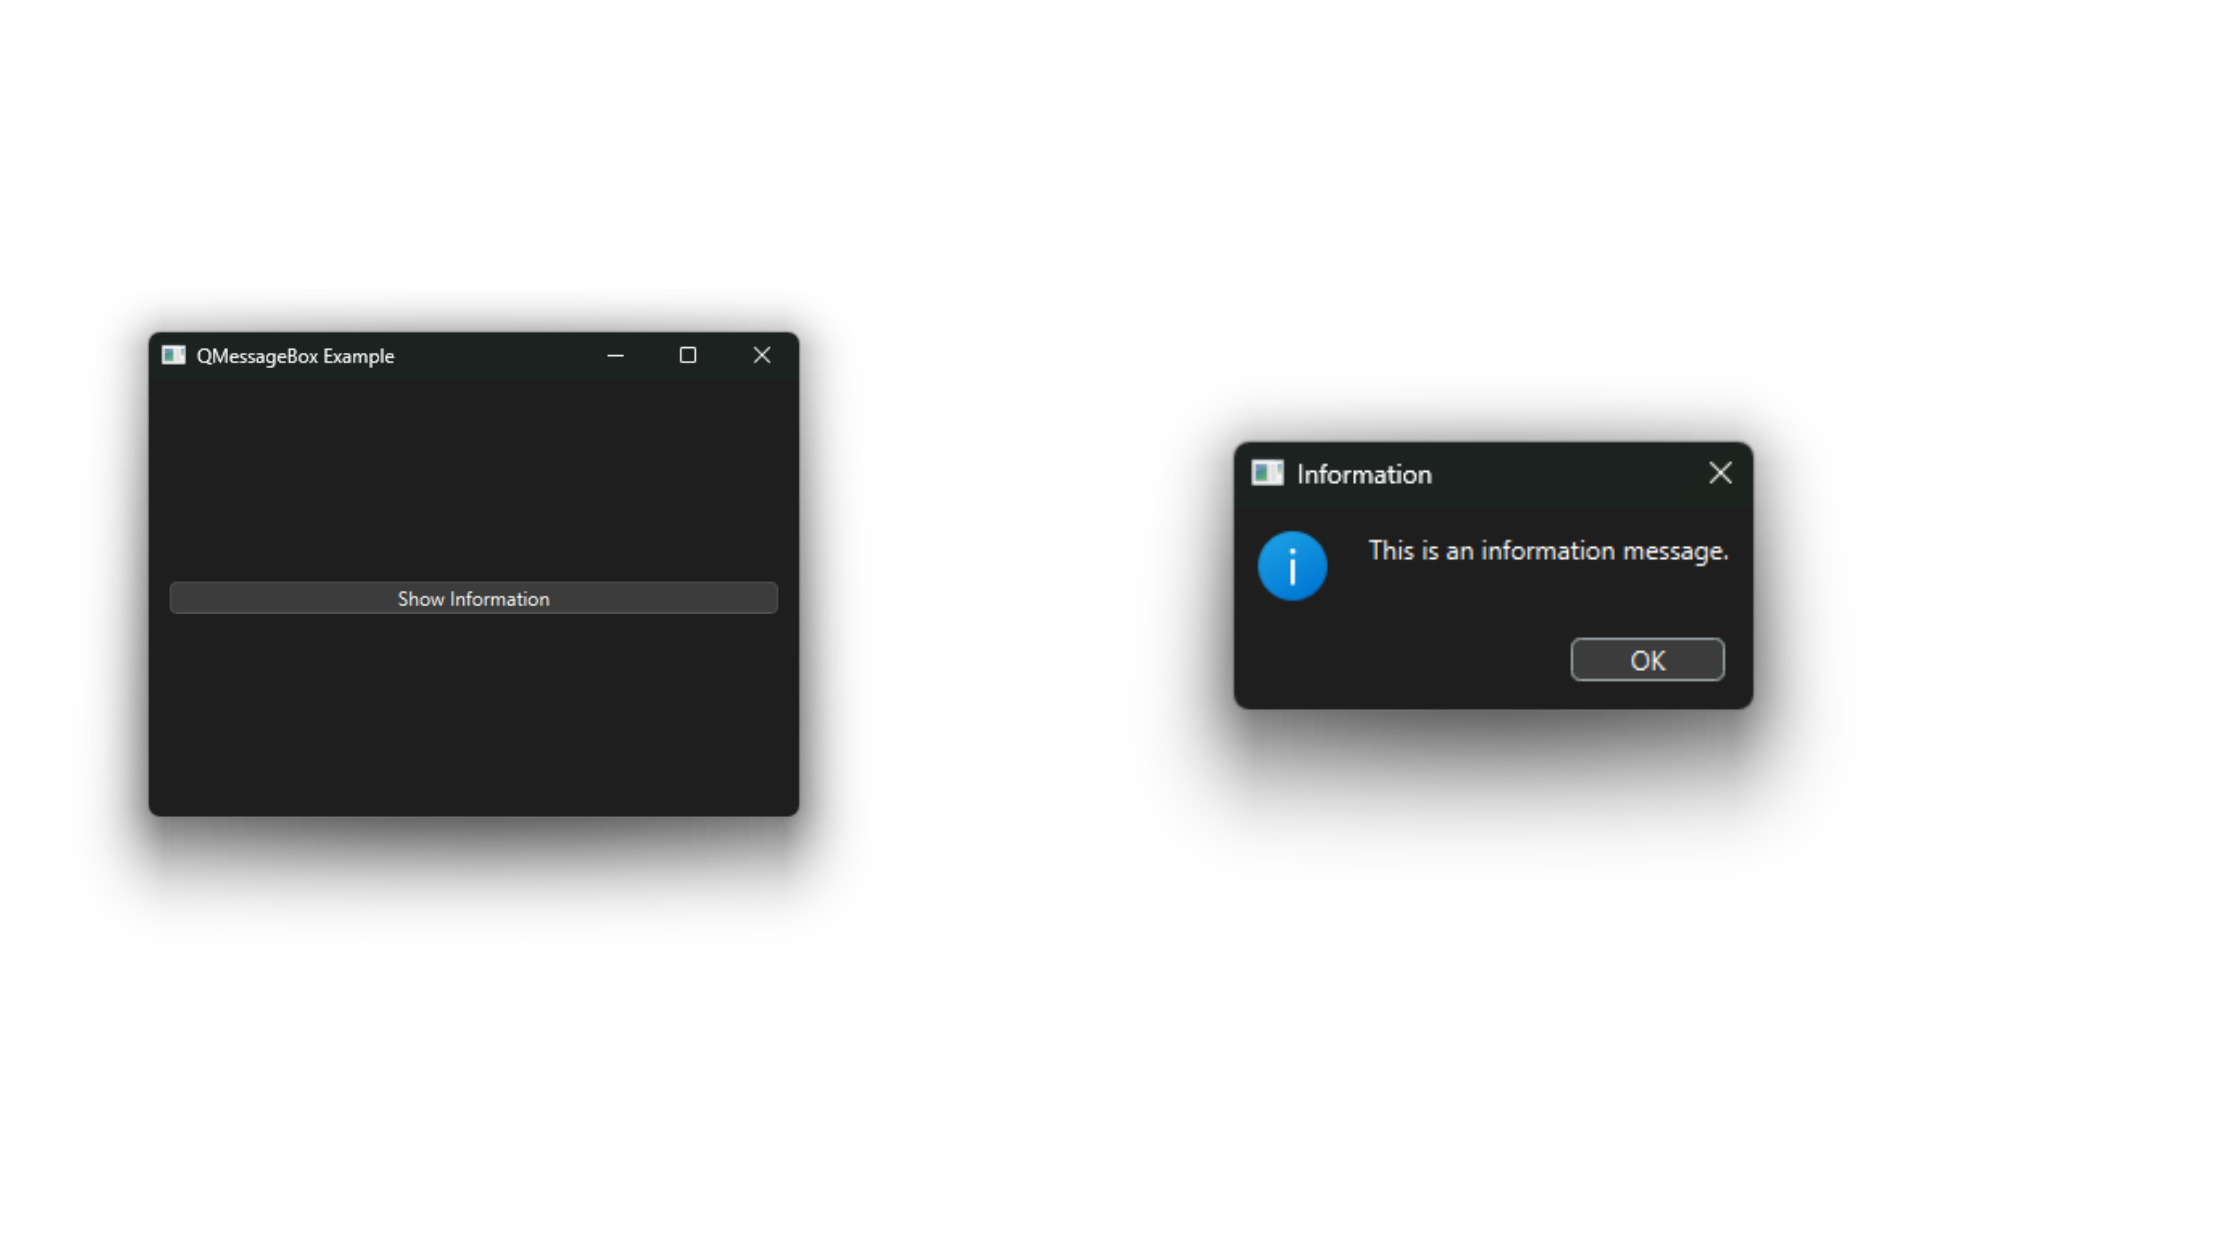
In this example, clicking the "Show Information" button displays an information message using QMessageBox.
Showing Different Types of Messages
QMessageBox can be used to show various types of messages: information, warnings, errors, and questions. Here’s how to create each type:
Information Message:
msg_box = QMessageBox()
msg_box.setIcon(QMessageBox.Information)
msg_box.setText("This is an information message.")
msg_box.setWindowTitle("Information")
msg_box.setStandardButtons(QMessageBox.Ok)
msg_box.exec()
Warning Message:
msg_box = QMessageBox()
msg_box.setIcon(QMessageBox.Warning)
msg_box.setText("This is a warning message.")
msg_box.setWindowTitle("Warning")
msg_box.setStandardButtons(QMessageBox.Ok | QMessageBox.Cancel)
msg_box.exec()
Error Message:
msg_box = QMessageBox()
msg_box.setIcon(QMessageBox.Critical)
msg_box.setText("This is an error message.")
msg_box.setWindowTitle("Error")
msg_box.setStandardButtons(QMessageBox.Ok)
msg_box.exec()
Question Message:
msg_box = QMessageBox()
msg_box.setIcon(QMessageBox.Question)
msg_box.setText("Do you want to proceed?")
msg_box.setWindowTitle("Question")
msg_box.setStandardButtons(QMessageBox.Yes | QMessageBox.No)
ret_val = msg_box.exec()
if ret_val == QMessageBox.Yes:
    print("User chose Yes")
else:
    print("User chose No")
Customizing QMessageBox
You can customize the QMessageBox by adding detailed text, custom icons, and changing the button labels:
msg_box = QMessageBox()
msg_box.setIcon(QMessageBox.Question)
msg_box.setText("Do you want to proceed?")
msg_box.setInformativeText("This action cannot be undone.")
msg_box.setWindowTitle("Custom Question")
msg_box.setDetailedText("Here is some detailed information about the action.")
msg_box.setStandardButtons(QMessageBox.Yes | QMessageBox.No)
msg_box.setDefaultButton(QMessageBox.No)
ret_val = msg_box.exec()
if ret_val == QMessageBox.Yes:
    print("User chose Yes")
else:
    print("User chose No")
In this example, the QMessageBox includes detailed text and sets the default button to "No."
Practical Example
Let's create a practical example where different types of messages are displayed based on user actions:
from PySide6.QtWidgets import QApplication, QMessageBox, QPushButton, QVBoxLayout, QWidget

class MessageBoxExample(QWidget):
    def __init__(self):
        super().__init__()

        layout = QVBoxLayout()

        self.info_button = QPushButton("Show Information")
        self.info_button.clicked.connect(self.show_info_message)

        self.warning_button = QPushButton("Show Warning")
        self.warning_button.clicked.connect(self.show_warning_message)

        self.error_button = QPushButton("Show Error")
        self.error_button.clicked.connect(self.show_error_message)

        self.question_button = QPushButton("Show Question")
        self.question_button.clicked.connect(self.show_question_message)

        layout.addWidget(self.info_button)
        layout.addWidget(self.warning_button)
        layout.addWidget(self.error_button)
        layout.addWidget(self.question_button)
        self.setLayout(layout)
        self.setWindowTitle('QMessageBox Example')

    def show_info_message(self):
        msg_box = QMessageBox()
        msg_box.setIcon(QMessageBox.Information)
        msg_box.setText("This is an information message.")
        msg_box.setWindowTitle("Information")
        msg_box.setStandardButtons(QMessageBox.Ok)
        msg_box.exec()

    def show_warning_message(self):
        msg_box = QMessageBox()
        msg_box.setIcon(QMessageBox.Warning)
        msg_box.setText("This is a warning message.")
        msg_box.setWindowTitle("Warning")
        msg_box.setStandardButtons(QMessageBox.Ok | QMessageBox.Cancel)
        msg_box.exec()

    def show_error_message(self):
        msg_box = QMessageBox()
        msg_box.setIcon(QMessageBox.Critical)
        msg_box.setText("This is an error message.")
        msg_box.setWindowTitle("Error")
        msg_box.setStandardButtons(QMessageBox.Ok)
        msg_box.exec()

    def show_question_message(self):
        msg_box = QMessageBox()
        msg_box.setIcon(QMessageBox.Question)
        msg_box.setText("Do you want to proceed?")
        msg_box.setWindowTitle("Question")
        msg_box.setStandardButtons(QMessageBox.Yes | QMessageBox.No)
        ret_val = msg_box.exec()
        if ret_val == QMessageBox.Yes:
            print("User chose Yes")
        else:
            print("User chose No")

app = QApplication([])
window = MessageBoxExample()
window.show()
app.exec()
In this example, four buttons display different types of message boxes when clicked.
All Available Button Types for QMessageBox
The QMessageBox class provides a set of standard buttons that can be used individually or in combination using the setStandardButtons method. These buttons are defined in the QMessageBox.StandardButton enum. Below is a comprehensive list of all available button types, as documented in the PySide6 QMessageBox documentation:
QMessageBox.Ok: An "OK" button to acknowledge the message.QMessageBox.Open: An "Open" button, typically used for opening a file or resource.QMessageBox.Save: A "Save" button, often used in save-related prompts.QMessageBox.Cancel: A "Cancel" button to dismiss the dialog without action.QMessageBox.Close: A "Close" button to close the dialog or window.QMessageBox.Discard: A "Discard" or "Don't Save" button, often used in save prompts.QMessageBox.Apply: An "Apply" button to apply changes without closing the dialog.QMessageBox.Reset: A "Reset" button to revert settings to their defaults.QMessageBox.RestoreDefaults: A button to restore default settings.QMessageBox.Help: A "Help" button to display help or documentation.QMessageBox.SaveAll: A "Save All" button for saving multiple items.QMessageBox.Yes: A "Yes" button for confirming an action in a question dialog.QMessageBox.YesToAll: A "Yes to All" button for batch confirmation.QMessageBox.No: A "No" button for declining an action in a question dialog.QMessageBox.NoToAll: A "No to All" button for batch rejection.QMessageBox.Abort: An "Abort" button to stop an operation.QMessageBox.Retry: A "Retry" button to attempt an operation again.QMessageBox.Ignore: An "Ignore" button to bypass a warning or error.QMessageBox.NoButton: Indicates no button is selected (used internally).
Using Multiple Buttons
You can combine buttons using the | (bitwise OR) operator. For example:
msg_box.setStandardButtons(QMessageBox.Yes | QMessageBox.No | QMessageBox.Cancel)
This creates a dialog with "Yes," "No," and "Cancel" buttons.
Handling Button Responses
When a button is clicked, msg_box.exec() returns the corresponding StandardButton value. You can compare this value to determine the user’s choice:
ret_val = msg_box.exec()
if ret_val == QMessageBox.Yes:
    print("User clicked Yes")
elif ret_val == QMessageBox.No:
    print("User clicked No")
elif ret_val == QMessageBox.Cancel:
    print("User clicked Cancel")